
With this feature, users can grant temporary access to their computer. For example, they can allow a technician to remotely access that computer under their supervision.
If you want to allow temporary access to your computer, please follow the steps to download and run the SupremeViewer Server application. When you want to end the connection/session, close the application. The technician or user helping you will no longer be able to connect to your computer until you run the application again. Important: For greater security, we recommend generating a new password before starting each new session.
!Hint: Only allow persons you trust to remote access your computer. Never give people you do not know or trust your SupremeViewer ID or password. We advise SupremeViewer users to be careful with unsolicited phone calls and not to grant access to their PC to anyone they do not know or trust.
If you are a technician or user who wants to connect to a remote computer that has SupremeViewer Server running, then follow the steps to download and run the SupremeViewer Client application.
1. Download SupremeViewer
Download the SupremeViewer Setup from the website. Select the latest available version from the list.
2. Start the setup
Start the setup on the target device you want to access. This could be a desktop or server computer running one of the following Microsoft Windows OS:
– Windows 7, 8, 8.1, 10 or 11;
– Windows Server 2008, 2012, 2016, 2019 or 2022.
3. Select “Run only”
Select “Run only” and “SupremeViewer Server” options, then press the “Accept – run” button. This will start the server application without installation and without administrative privileges.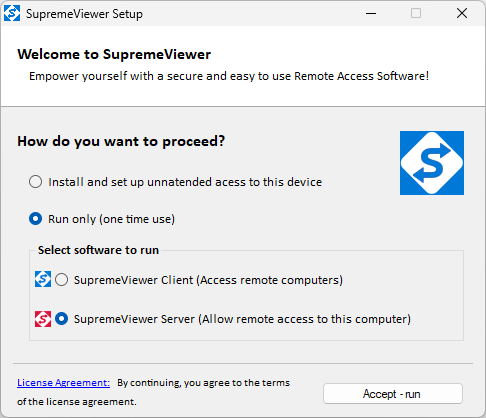
4. Use SupremeViewer Server UI
The started application will show the generated ID and password. If a green circle with message “Ready to connect” is shown at the bottom of the application, that means the server is ready to accept connections. Use these credentials from the SupremeViewer Client app to connect to the server.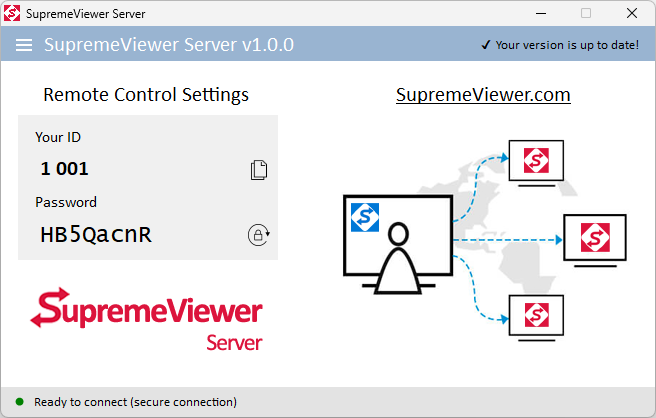
5. Close the server
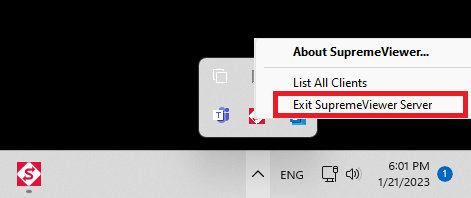
Close the server after session completes. Right click on the application icon from the system tray and then choose “Exit SupremeViewer Server“.
1. Download SupremeViewer
Download the SupremeViewer Setup from the website. Select the latest available version from the list.
2. Start the setup
Start the setup on the target device you want to access. This could be a desktop or server computer running one of the following Microsoft Windows OS:
– Windows 7, 8, 8.1, 10 or 11;
– Windows Server 2008, 2012, 2016, 2019 or 2022.
3. Select “Run only”
Select “Run only” and “SupremeViewer Client” options, then press the “Accept – run” button. This will start the client application without installation and without administrative privileges.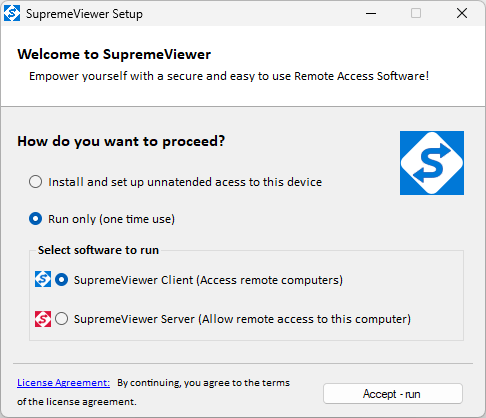
4. Use SupremeViewer Client UI
The started application will show a green circle with message “Ready to connect” at the bottom, it means that the client is ready to connect to the server.
5. Connect to the server
Enter the “Partner ID” shown on the server and click the “Connect” button.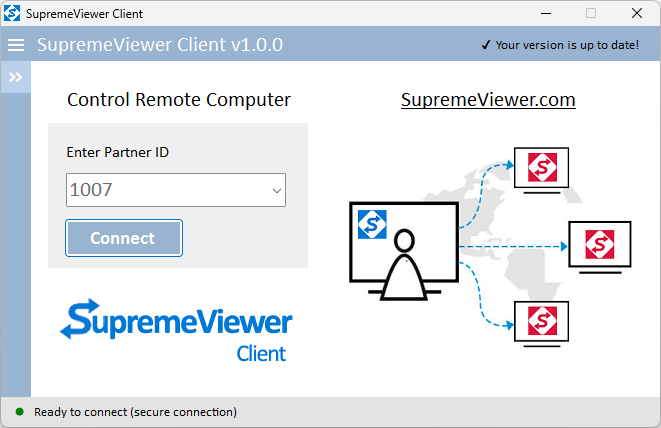
6. Enter password
When the connection between client and server is established a popup prompt will ask for the password. Enter the password provided by the SupremeViewer Server application and click the “Log On” button.
7. Close the client
Close the opened window after session completes.