
Unattended remote access, allows users to quickly and instantly set up a remote access sessions with devices anywhere in the world even when they are not actively in use. With unattended access, businesses can streamline their operations and enhance security by granting authorized users the ability to remotely connect to devices, enabling seamless collaboration and productivity.
Unattended access is useful for large companies with users operating in different countries. Without needing a user to grant access to the remote device, IT can provide 24/7 remote support, install necessary updates and patches, easily set and enforce identity management, and any other security tasks from anywhere.
How to enable unattended access in SupremeViewer?
To enable unattended access to a computer, all the user needs to do is to install the SupremeViewer Server software. After the installation, the application will be started as a Windows service and this will allow it to start automatically when the computer starts, and no human interaction will be needed. The user from the other end only needs to know the ID number and generated password in order to connect and log in to the computer. Please follow the steps on how to install SupremeViewer and enable unattended access.
1. Download SupremeViewer
Download the SupremeViewer Setup from the website. Select the latest available version from the list.
2. Start the setup
Start the setup on the target device you want to access. This could be a desktop or server computer running one of the following Microsoft Windows OS:
– Windows 7, 8, 8.1, 10 or 11;
– Windows Server 2008, 2012, 2016, 2019 or 2022.
3. Select “Install”
Select “Install and setup unattended access to this device” and click “Accept – next” button.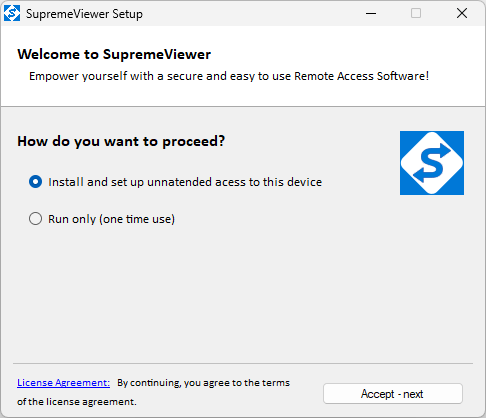
4. Follow the installation steps
4.1. Click “Next” on the welcome windows.
4.2. Select “SupremeViewer Server” and click “Next“.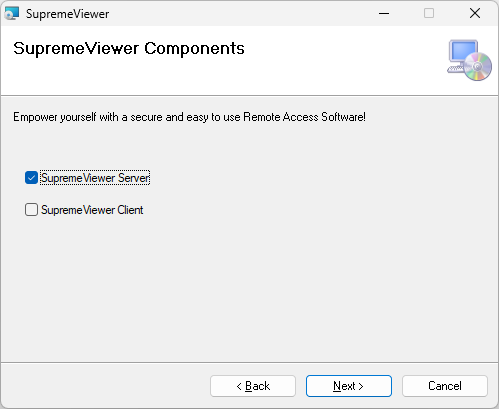
(* Select both, if you want to have client and server installed on the same computer).
4.3. Accept the license agreement.
4.4. Complete the installation with default options.
4.5. An “Administrator” password will be required to complete the installation.
5. Use SupremeViewer Server UI
The started application will show the generated ID and password. When a green circle with message “Ready to connect” is shown at the bottom of the application, that means the server is ready to accept connections. Use these credentials from the SupremeViewer Client app to connect to the server.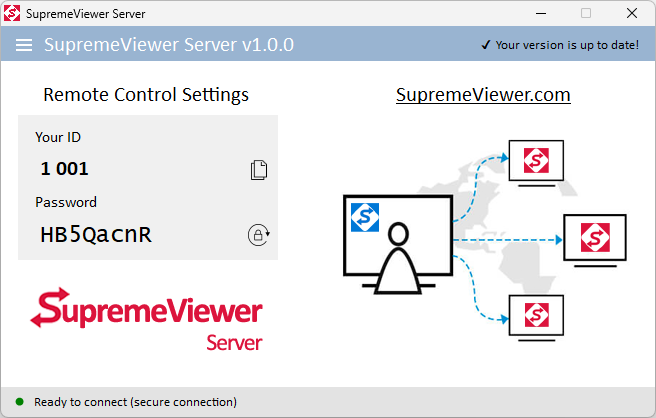
6. Background mode
The SupremeViewer Server will remain running in background mode as it is installed for unattended access. If the user interface (UI) form is closed or if the computer restarts, it can be accessed again by clicking on the system tray icon.
1. Download SupremeViewer
Download the SupremeViewer Setup from the website. Select the latest available version from the list.
2. Start the setup
Start the setup on the target device you want to access. This could be a desktop or server computer running one of the following Microsoft Windows OS:
– Windows 7, 8, 8.1, 10 or 11;
– Windows Server 2008, 2012, 2016, 2019 or 2022.
3. Select “Install”
Select “Install and setup unattended access to this device” and click “Accept – next” button.
4. Follow the installation steps
4.1. Click “Next” on the welcome windows.
4.2. Select “SupremeViewer Client” and click “Next“.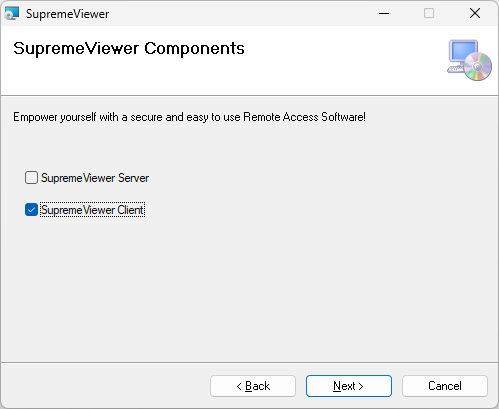
(* Select both, if you want to have client and server installed on the same computer).
4.3. Accept the license agreement.
4.4. Complete the installation with default options.
4.5. An “Administrator” password will be required to complete the installation.
5. Use SupremeViewer Client UI
The started application will show a green circle with message “Ready to connect” at the bottom, it means that the client is ready to connect to the server.
6. Connect to the server
Enter the “Partner ID” shown on the server and click the “Connect” button.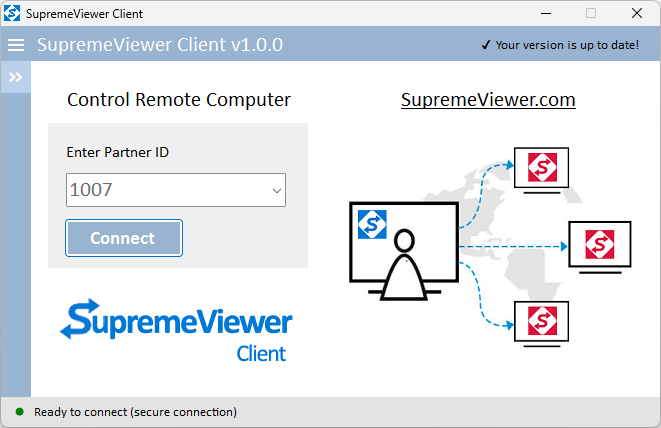
7. Enter password
When the connection between client and server is established a popup prompt will ask for the password. Enter the password provided by the SupremeViewer Server application and click the “Log On” button.
8. Close the client
Close the opened window after session completes.